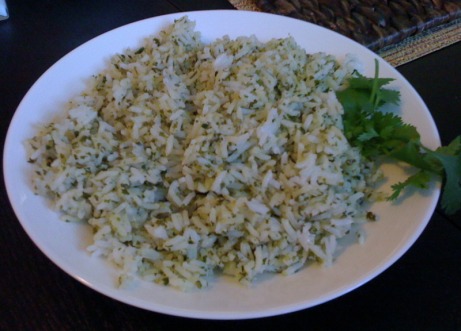
 If you like Chipotle, you probably like cilantro rice! I have been wanting to make this rice at home for the longest time. I finally came across a recipe that sounded perfect. The best part is, it's extremely easy! I was done within 20 minutes (and rice takes about 15). Easy and delicious, you can't go wrong there. This is great with fajitas, burritos, tacos, you name it. Enjoy!
Ingredients:
Place one cup of rice and two cups of water in a large pot. Bring the water to a boil and stir. Lower the heat and simmer for 15-18 minutes or until all the water is absorbed and the rice is tender. Meanwhile, using a food processor/blender mix together the cilantro, salt, lime juice, olive oil and garlic. Blend together until smooth. After the rice has cooked, fluff it with a fork and add the cilantro mixture to the rice. Stir well and serve!
24 Comments
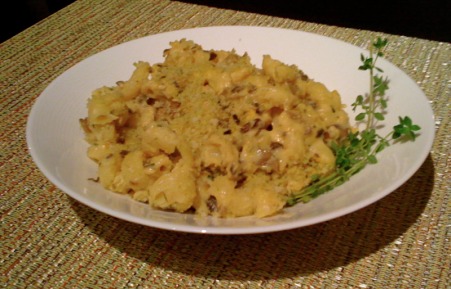 *Note: This picture does not do the dish any justice. I was too hungry to take a decent photo!* Ok this is by far the most mouth watering, amazing, and flavorful macaroni and cheese ever. I decided to make this while my husband was out of town, since he isn't a big fan of mac and cheese. I intended to eat it for a about a week for lunch, but that did not happen. I finished it in about two days! All by myself! I was a bit upset with myself for eating like such a pig, but I just couldn't help it. The regular ol' mac and cheese that I make is definitely good, but this one doesn't even compare. The sauteed mushrooms and herbs add so much flavor to this dish, which is great when cooking with something flavorless like fat free cheese. The blend of cheeses worked very well too. I was wary about substituting gruyere cheese for fat free swiss cheese, but the results were surprisingly good. The bread crumbs on top also add a nice crunchiness to each bite. Overall, I was ecstatic with the results. I cannot wait to make this again and this time I will have my husband try it as well. I highly recommend this and think everyone should add it to their grocery list...now! :) Ingredients:
Preheat the oven to 400 degrees. Meanwhile, cook the pasta according to the package directions, drain and set aside. Then, chop the shallot, mince the garlic and herbs, and shred the cheeses. Set aside all ingredients. Heat 1 tablespoon of olive oil in a large skillet. Add the chopped mushrooms and saute until the mushrooms are tender, about 5-7 minutes. Stir in the garlic and saute until fragrant, about 1 minute. Season the mixture with salt and pepper, add the white wine vinegar and set aside. Next, in a medium saucepan heat the other tablespoon of olive oil. Whisk in the flour and make a paste. Continue whisking the paste for a couple of minutes until it turns golden. Stir in the fresh herbs and continue whisking for about 1 minute, until they are fragrant. Pour in the milk and whisk constantly while the mixture simmers and thickens. Finally, add the shredded cheese gradually, stirring constantly so that there are little or no clumps. Add the cooked pasta and mushroom mixture into the cheese sauce. Stir really well to combine everything together evenly. Pour the mixture into abaking dish coated with cooking spray. Sprinkle the breadcrumbs on top and bake for 15-20 minutes. Let it cool for 15-20 minutes before serving. Enjoy! 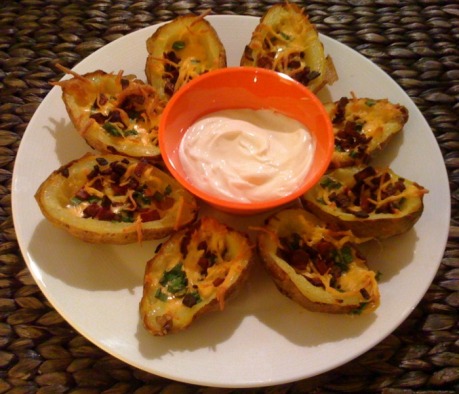 Last weekend I made a life changing discovery. That discovery was Jennie-O Extra Lean Turkey Bacon. I haven't had bacon in over five years because of my diet! This bacon is 100% Swank legal. One piece has only 0.5 grams of fat and 0 grams of saturated fat. I am so excited! I don't really plan on eating it with breakfast much, but bacon is so wonderful to use as flavoring in so many dishes. You will definitely see some bacon appearing on future recipes! Oh and the best part was, the bacon tastes great!
The first thing I decided to make with my new discovery is potato skins. I have made potato skins in the past, but they just aren't the same without bacon. Now they are perfect! These were delicious, so delicious that my husband felt it was necessary to tweet about them and eat them for breakfast :). Thanks to the Nov/Dec issue of the Clean Eating Magazine for publishing the recipe! Ingredients:
Preheat the oven to 425 degrees. First, scrub the potatoes clean. Then, poke them about five times each with a fork and rub them with a little olive oil. Sprinkle kosher salt on the outside of each potato and then place them in the oven, directly on the rack. Bake the potatoes for 50 minutes to an hour, or until the potatoes are completely tender. Once the potatoes are cooked, place them in a bag or container in the refrigerator for at least an hour and even overnight, until completely cooled. After they have cooled, cut each potato in half and scoop out the inside, leaving about half an inch of the potato in the skin. Mix together the cayenne, paprika and salt in a small prep bowl. Sprinkle the seasonings over each potato skin and spray each potato with a little olive oil cooking spray. Spray the baking sheet with the spray, put the potatoes on the sheet and then bake for 10 minutes. While the potatoes are baking, finely chop the turkey bacon until cooked through. After the potatoes are cooked, sprinkle each skin with some cheese, bacon pieces and green onions. Bake for another 3-5 minutes, or until the cheese is bubbly. Let the skins cool for a little, the put a little dollop of yogurt on each one. Eat hot, warm, or even cold if you want. They are that good! Print This Recipe!
Source: Tasty Treats By Michi Original Easy Balsamic Grilled Chicken Low Fat Creamed Spinach 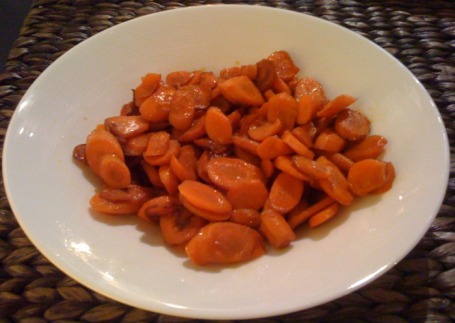 I had some leftover carrots after Thanksgiving that I didn't know what to do with. Usually I use carrots as a base for soups, roast them, or just snack on them raw, but I decided to try something quick and easy as a side for dinner last night. This came out extremely delicious and was a nice little break from our usual carrot recipes! Of course, it's low fat, healthy, and this time, also vegetarian and vegan friendly. I know some of my veggie followers have wanted more veggie recipes, so here's one for you! ;)
We had this with my Easy Balsamic Grilled Chicken recipe and it was a perfect combo with the chicken and the Low Fat Creamed Spinach. Recipe links above! Ingredients:
Cut the carrots into 1/4 inch slices at a diagonal. Heat the olive oil in a medium sized pan and sauté the carrots for about 8-10 minutes, or until cooked through and tender. Once the carrots are cooked, add the balsamic vinegar and brown sugar and stir to coat. That's it! Parents, I definitely think this would be a winner for kids. Who doesn't like vegetables with sugar on them? 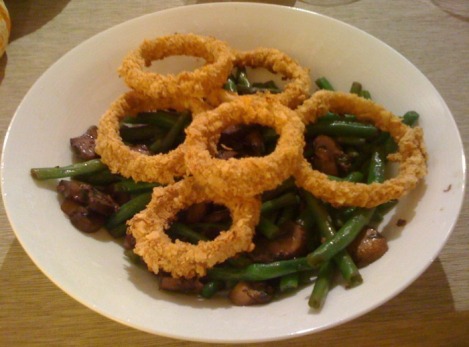 This was by far the best side we had at our Thanksgiving. The BEST. I wanted to incorporate green beans into our meal, but I'm not really a fan of the traditional soup based green bean casserole and unhealthy pre-made onion topping. I looked a little and found that Michael Chiarello has a new take on green bean casserole. After reading the ingredients online and watching a short clip on Food Network's website, I was sold. The meal did not disappoint and I cannot wait to make it for friends and family for Christmas! The caramelized mushrooms were perfect and the sauce was delicious.
I didn't want to add unnecessary fat by putting deep fried onion rings on top, so I referred to another favorite chef, Ellie Krieger. She has a wonderful baked onion ring recipe that went perfectly with this casserole! On a side note, I made a another find while making this recipe. The Kettle Brand has a line of baked chips that are so scrumptious. I will never buy baked Lays again! Ingredients for Green Bean "Casserole":
Bring a couple of quarts of salted water to boil. Boil the green beans for 4 minutes, drain well, and then transfer them to a pan or plate to cool. Heat the olive oil in a large skillet over medium heat. Add the mushrooms to the pan and cook until brown for about 4-5 minutes. Don't stir the mushrooms so that they can properly caramelize. After the mushrooms have cooked, add the minced garlic and the thyme. Season with sale and pepper and cook until the garlic is fragrant, about 3-5 minutes. Remove the pan from the heat and add the cognac. Return the pan to the heat and add the wine and chicken broth. Stir to combine and simmer until the sauce thickens, about 8-10 minutes. Finally, add the green beans to the mushroom sauce and then toss everything together. Taste the mixture and add salt and pepper to taste if necessary. Top with baked onion rings (recipe below). Serve immediately, or at room temperature. Baked Onion Ring Ingredients:
Directions: Preheat the oven to 450 degrees. Peel the onion and cut it into rings. After that, put the entire bag of Kettle Chips into the food processor and pulse them until they are fine crumbs. Then, put the onion rings into a zip-loc bag with 1/2 cup of flour. Shake the bag so that the onions are completely coated with the flour. Now, create an assembly line for your onion rings. In the first bowl, combine the buttermilk, 2 tablespoons of flour and pepper. In the second bowl, put the crumbs from the chips. Finally, dip each of the floured onion rings into the buttermilk mixture and then into the crumb mixture. Make sure to pat the crumb mixture on the onion rings so they stick. Place each onion ring on a baking sheet sprayed with olive oil cooking spray. Let the onions sit on the sheet for a few minutes before you put them into the oven. Spray the onion rings with more olive oil cooking spray and then bake for 20 minutes or until they are golden brown and crispy. Sprinkle more salt on top if necessary and place the onion rings on top of the casserole. These onion rings are also excellent as a side with many other dishes! 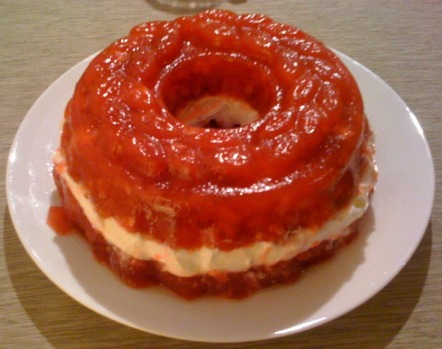 This jello has been a staple for the holidays for the last few years, and even though we only had a Thanksgiving for two, I had to make it for the first time! It is that sweet, cold, crunchy textured dish that you need to even out the rest of the sides you are eating on Thanksgiving. This is a favorite in our household and most often referred to as "refreshing" :) (that's an inside joke for my family). Try this recipe, it's easy and delicious! Thanks to my sister-in-law, Lynn, to introducing it to us!
Ingredients:
Directions: Begin by preparing your ingredients. Strain the pineapple and make sure to remove all the liquid, chop the walnuts and slice the strawberries. Then, make the jello according to the package directions. Make sure to use 1/2 cup less water than listed on the package. You will already have some extra liquid from the strawberries and the juice that is inside the pineapple. Add the strawberries, walnut, and pineapple to the jello mixture. Spray your jello mold with canola spray. Pour the mixture into the sprayed mold , filling it halfway. Refrigerate the mold for at least 4 hours, so the mixture has time to harden. Then, add the 3/4 cup of non-fat yogurt in an even layer on top of the jello inside the mold. Finally, add more jello mixture to fill the mold. Cover the mold with some saran wrap and refrigerate overnight. *If you have any extra jello mixture, put it in another container to refrigerate and enjoy later.* Leave the mold in the refrigerator until you are ready to serve. Once ready, put the mold in a small mixing bowl filed with warm water. Use a knife to slide around the mixture inside mold and then flip the mold out onto a plate carefully. Serve immediately and enjoy! Refrigerate any leftovers immediately before the mold melts and turns into a slop :). 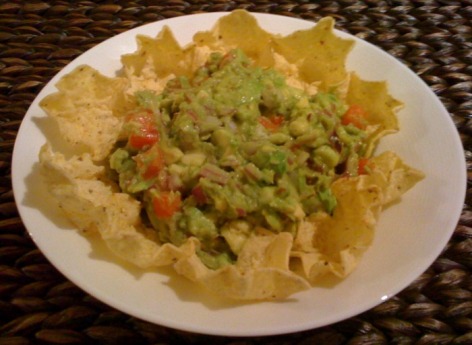 Ina has some of the best recipes, one of them is this easy and delicious guacamole! The dip only takes about 10 minutes maximum to make from scratch and the outcome is perfect. I love how chunky it is! This is great to bring to a party with some baked chips or to use for dipping with some of your favorite Mexican dishes. Enjoy!
Ingredients:
Directions: First juice the lemon and set aside. Then chop the onion, tomato, and mince the garlic. After all those ingredients are prepared, cut the avocados in half, remove the pits, and scoop the flesh of the avocados into a bowl. Immediately after the avocados are in the bowl, add the lemon juice, hot sauce, onion, garlic, salt, and pepper and toss well with a large spoon. After that, slice the avocados into chunks using a sharp knife until you get your guacamole to the desired consistency (I like mine a little chunky). Add the tomatoes, toss some more, and then taste to see if the dip needs more salt, pepper, or hot sauce. Serve immediately or refrigerate and save for later. 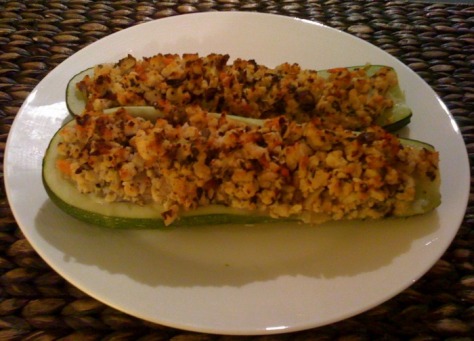 Andrew loves zucchini, so I was on the lookout for a good recipe that called for it. I came across this recipe on one of my favorite blog sites, http://annies-eats.com. The outcome was very yummy and the turkey almost tasted like sausage because of all the strong flavors. In fact, I think I am going to use this turkey mixture as a substitute for sausage in other recipes from now on! I also think this mixture would be amazing for stuffed mushrooms. Perhaps you will see a blog update in the near future with that experiment!
I made this recipe as a main dish, but after eating it I think it's better as an appetizer or side dish to another meal. Even though it has meat inside, we found ourselves wanting something else to go with it. I also think some plain yogurt would be a delicious addition to the top. Yum! Ingredients:
Preheat the oven to 375 degrees. Cut the zucchini in half lengthwise and scoop out the seeds and insides, leaving the shell about 1/4 inch thick. Save the soft part of insides of one of the zucchini and set aside. Prepare all your other ingredients. Chop the onion, mince the garlic, chop the mushrooms, herbs, etc. Heat 1 tablespoon of olive oil in a medium skillet over medium high heat. Saute the onions and garlic for a few minutes, until the onions are soft and translucent. After the onions are soft, add the mushrooms and zucchini insides. Saute for a couple of more minutes until the mushrooms are soft. Set aside In another medium sized skillet, heat 1 tablespoon of oil over medium high heat. Saute the ground turkey until its white and cooked through. Make sure to break up the turkey into tiny ground pieces. After the turkey has cooked, add the onion and mushroom mixture and stir well. Then add the wine, tomatoes, and herbs to the skillet as well. Stir and cook the mixture for another minute or two. Remove the pan from the heat and let the mixture cool for a few minutes. Once the mixture has cooled a little bit, add the egg, parmesan topping, salt, pepper and stir well. Scoop the turkey mixture into the zucchini halves. Pour water into the baking sheet so its about 1/4 inch high. Put the stuffed zucchini on the baking sheet and put in the oven for 40 minutes, or until the stuffing is golden brown. Serve immediately and enjoy this very healthy dish! 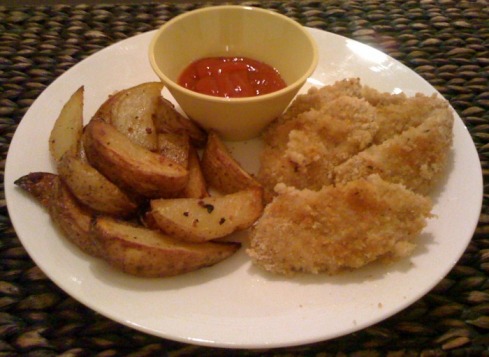 Oh yes, I said parmesan! This is not the parmesan you are expecting, but it's just as delicious! I decided to try some vegan/soy parmesan topping and I was not disappointed! What makes grated parmesan taste good? Parmesan flavor? Check! Parmesan consistency? Check! Fat content? Not so much. I am so happy to have found this and will be using it in a lot of my recipes from now on. Next on the diet hunt, blocks of fat free parmesan cheese. :)
This recipe is basically the same as my previous blog entry of Baked Italian Chicken Tenders, just with the parmesan added and different fries. This is a quick and easy meal for a weeknight. Yum! Ingredients for Chicken Tenders:
Directions for Chicken Tenders: Preheat the oven to 400 degrees. First, cut the chicken breasts up into chicken tenders. Then, put the chicken tender pieces in a large bowl and pour the buttermilk over them. Toss the chicken tenders in the buttermilk and make sure they are completely coated. Cover the bowl and put them in the refrigerator for at least 30 minutes. Combine the bread crumbs and parmesan topping in a bowl with a fork or whisk. Once the chicken is done marinating, take the chicken pieces directly from the buttermilk and coat each tender it in the breading. Make sure to pat the breading so that it sticks to the chicken pieces all over. Put the chicken tenders on a baking sheet and drizzle with a little olive oil. Bake the chicken tenders for 12-15 minutes, turning once, or until browned and cooked through. Serve immediately with your favorite dipping sauce. Directions for Potato Wedges: While the chicken is marinating, cut the potatoes into wedges. First, cut the potatoes lengthwise and then cut each half in thirds lengthwise. You'll have 6 wedges if you use a large potato. Put the potatoes on a cookie sheet and cover the potatoes with the olive oil, salt and pepper. With washed hands, toss the potatoes inside the oil, salt and pepper to make sure each potato is well coated. Spread the potatoes on the sheet in a single layer so one side of each potato is down. Bake the potatoes for 30 to 35 minutes, turning the potatoes once after about 20 minutes. Bake until the potatoes are browned and crispy on the outside, but not burned. Sprinkle with a little more salt and serve immediately. Yum! Tip: Put the potatoes in the oven first, on the bottom rack, so that the fries and chicken tenders are done at the same time.  Happy Halloween, everyone! Halloween is one of my favorite holidays and I loved that I was able to make something fun and festive for dinner! The original recipe for mummy dogs calls for Pillsbury Crescent rolls, which are extremely fattening and unhealthy. I tried out a new biscuit recipe instead and they came out great! For the boo-tatoes I used 365 organic instant potatoes. They are delicious and make extremely creamy potatoes which were great for the ghosts. I know I should of posted this recipe before Halloween, but unfortunately I was too busy. Make them next year if you can!
Ingredients for Mummy Dogs:
Preheat the oven to 450 degrees. Mix together the flour, baking powder, baking soda, and salt. In a separate bowl, whisk together the buttermilk and oil. Add the milk mixture to the flour mixture. Mix it with a wooden spoon or with your hands. This works better than the standing mixer. Add a little more milk if the dough is too dry to stick together. On a lightly floured surface, knead the dough gently 10 to 12 times. Then, using a floured rolling pin, roll the dough out to about a 1/2 inch thick. Cut the dough into thin strips. Wrap each turkey dog with the strips of the dough. Don't worry if pieces of the dough break off, mummies aren't wrapped perfectly! Make sure to leave a little piece opened at the top for the eyes! Bake the mummy dogs on a non-greased cookie sheet for 12-15 minutes, or until the dough is golden brown. Use ketchup to make two eyes on the mummies and serve with some blood (ketchup). Enjoy! Ingredients for Mashed Boo-Tatoes:
Put the mashed potatoes inside the piping bag and pipe them out into the shape of ghosts. Put two black sesame seeds on each for eyes. Serve with the mummy dogs and enjoy! |  AuthorMy name is Michelle Bolooki and I was diagnosed with Multiple Sclerosis in June 2002. I have been on the Swank MS Diet since April of 2005. I have created this blog in order to share some delicious and healthy low fat recipes that I have come across the last few years. Enjoy! CategoriesAll |
 RSS Feed